WordPad is a text-editing program available in the Microsoft Windows operating system.
Follow these step-by-step instructions to use WordPad
This article assumes that you have a PC with Windows 10 installed.
There are several way to locate this app on your computer. This is the easiest.
Click on the Search button/icon on the task bar (next to the Start button) and
type in WordPad. Then click on the matching result, which should be
at the top of the list. ![]()
Step 1: Open WordPad. The screen should look like this:

Step 2: You’re now going to choose a font – the design in which the letters you’ll be typing will appear.
In the third row from the top of the screen, you’ll see a box with a name in it (in this example, ‘Calibri’) and a little downward-pointing arrow. The arrow indicates that this is a drop-down list. When you click on the arrow a list will drop down.
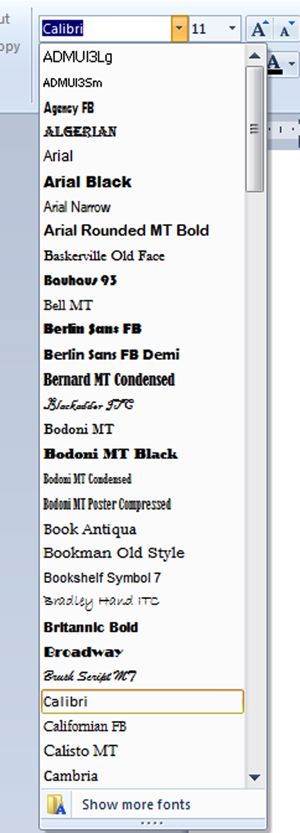
This particular list consists of all the fonts that you can choose to create your document. Scroll down the list and you’ll find even more fonts.
Let’s assume that you’d like to use the ‘Arial’ font. Click Arial on the list. The name will now appear in the box at the top of the screen.

Step 3: Type ‘Good Morning’ and press the ‘Enter’ key. Have a look at what you’ve done.
Step 4: Choose another font, type ‘Good Morning’ again and press ‘Enter’. Now compare the two. Here we’ve chosen ‘Broadway’ as the second font.

Step 5: You can also change the size of the letters. Next to the font box near the top of the screen, you’ll find another box containing a number (’11′ in this example). As you did with the font box arrow, click the arrow in this box. A drop-down list appears that consists of numbers. These are the numbers of ‘points’ that letters are measured in. By selecting a bigger or smaller number, you can choose how big to make your writing.
Click ’20′ and type ‘Good Morning’ again.
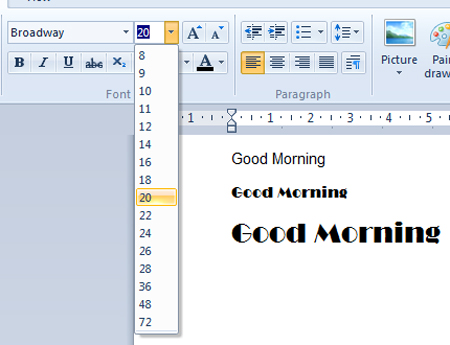
Step 6: Here’s a shortcut to changing the size of your letters. Next to the number box you’ll see two squares, each one containing a letter ‘A’, one bigger than the other (see right).
If you click on the button with the bigger ‘A’, the size of your text will get bigger. If you click on the other button, it will become smaller.
Step 7: Now experiment with the font tools, which you’ll find under the font box. They are:
- B bold
- I italic
- U underline
- abc strike through
- subscript (a letter or figure written below the line)
- superscript (a letter or figure written above the line)
plus the highlighting tool and the font colour tool, both of which you need to click to cause a drop-down list to appear.
If you place your cursor over each of the buttons, a description of what it does opens. Below you can see what ‘B’ stands for:

Try out each font tool. Below we’ve changed the font back to Arial, size 16, and then tried each button in turn.

Step 8: Now try WordPad’s aligning tools. These push text to one margin or the other (‘align left’ and ‘align right’), centre each line (‘centre align’) or make both sides straight.
To the right of the box containing the font colour tool, you’ll see a row of four similar boxes with lines representing text arranged in four different ways:

Place your cursor over each one for a description, then try them. Highlight some text by clicking on it three times in quick succession. Then click on one of the aligning tools to see where the text moves to.
These tools are very handy for such jobs as centring a title or placing an address on the right. Here’s what happens with ‘Good Morning’ by clicking on each of the first three boxes:

Step 9: To the right of the aligning tools, you’ll find four insert tools.

With these, you click to insert a picture from a file, draw a picture to insert in your document, automatically insert the date and time or add a particular object. Try experimenting with them.
Step 10: You can change the way a word looks after you’ve typed it. Simply double-click on it to highlight it – it turns blue to show that it’s been selected.

You can now use any of the tools above to change the word – for instance, changing its font or size.

While it was selected, ‘something’ was changed to a 36 point size and made bold, underlined and red!
Step 11: You can also change a paragraph. If you triple-click within one, this will highlight it entirely. You can then change its size and colour, make it italic and underline and centre it:

Step 12: One of the most important things to learn to do with your work in WordPad is to save it. That way, you can turn off the computer and later go back to what you’d done. But you really should save your work every few minutes. Then, if there’s a power cut, you’ll lose only a few minutes’ work.
To save, go to the top left-hand corner of the WordPad screen and click the arrow in the blue box (indicated here with the yellow arrow):
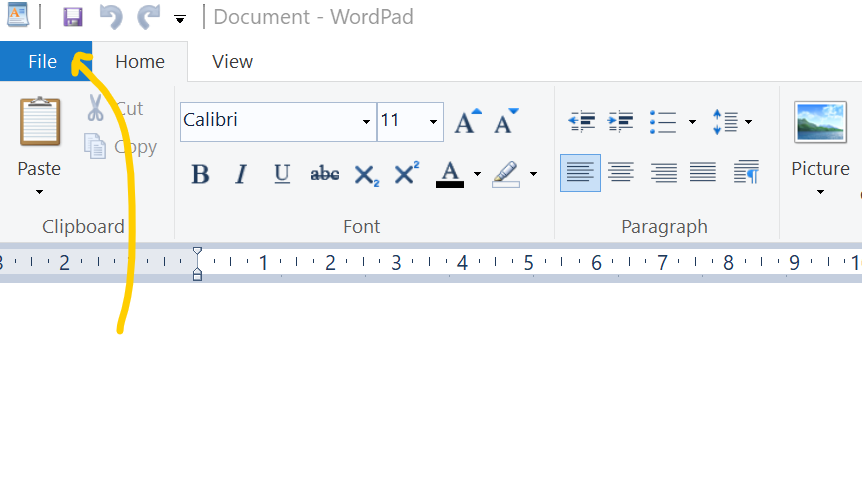
The ‘File’ drop-down list appears. Now click Save. This saves the document exactly as it is.
Step 13: There’s another way of saving your work – by using the ‘Save as’ option. If you use this, you can change some of the document’s attributes – its name or its format, for instance.
To use ‘Save as’, place your cursor over Save as. A new menu appears to the right. Move your cursor straight to the right on to this and click Rich Text document. (‘Rich Text’ is a format that allows you to embed images and other things.) The name of your document will now end with ‘.rtf’.
The ‘Documents library’ now appears. This is where your saved document will be kept. In the box below the main screen, headed ‘File name’, type in a name for your document. Here, ‘First attempt’ is the file name:
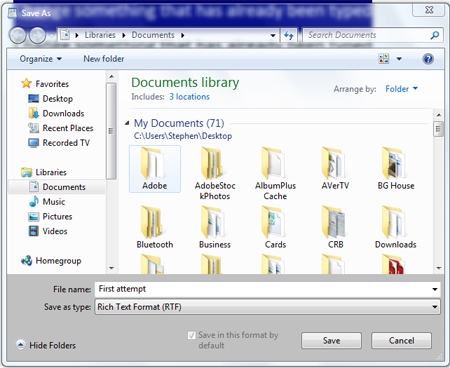
It’s important that a document’s name relates to its content – for example, ‘letter to bank’ – so that you can find it again later.
Now click Save to keep this document in the Documents library.
Step 19: Finally, as well as saving your document in digital form within your computer, you can also print it. Open the ‘File’ drop-down list again and, this time, select Print. Then, moving your cursor to the new menu on the right, click Quick print:
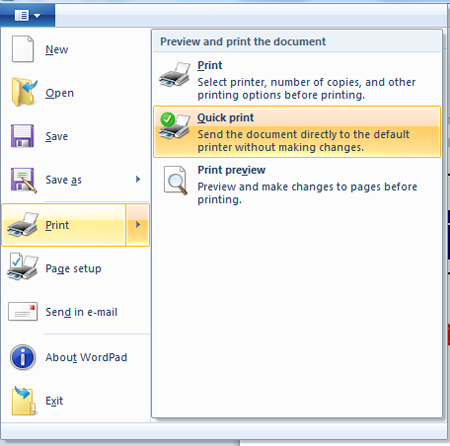
As long as your printer is set up and turned on, your document will print.
Last updated November 2023